10 ways to make your life easier in Capture One
This is my round up of some tips and tools you can use to make your exprience just a bit better within Capture One
1. Turn off OpenCL

Turning off OpenCL can help solve many rendering and performance issues.
Are you having a lot of performance and graphical problems within Capture One? Is it not running as smooth as you think it should? I get these questions a lot and it usually comes from photographers who are working on older computer systems and they have just upgraded to Capture One 7. Capture One 7 takes more advantage of OpenCL, which is basically Phase One’s way of pulling more processing load off your CPU and spreading it out across the graphics card, for processing and displaying images. The only problem is Capture One 7’s recommenced graphics card RAM is 1GB, while most older Mac’s only have 512MB or lower unless you purchased an upgraded graphics card at time of purchase or installed a new one manually.
My advice has always been turn it off and give the CPU the full load, most of the time it can handle it all while greatly improving stability and decreasing errors. Turn off OpenCL by going to Preferences > General > Hardware Acceleration and set both ‘Display’ & ‘Processing’ to never. Restart Capture One and see if you notice a change, I sure did. If you do have a powerful computer with a nice graphics card you can most likely ignore this suggestion.
2. Uncheck Nikon or Canon for tethering

Uncheck which ever brand you are not using for a stable session.
Tethering with a DSLR and noticing some odd behavior such as the camera not found error or just general poor connectivity? This could be because the Canon and Nikon SDK’s are running simultaneously. Usually when you connect either a Canon or Nikon Capture One will tell you either the Nikon or Canon driver’s will need to be turned off and Capture One will need to be restarted. But sometimes I have noticed it does not always catch it and will leave both running at the same time sometimes. The two camera SDK’s don’t play well together, so if you have a 5D MKIII connected it is recommended you turn off the Nikon SDK and vice versa if you have say, a D800 connected.
This can be easily done by going to Preferences > Capture > Providers and then at the bottom uncheck whichever system you are not using, you may leave Leaf and Mamiya both checked as they do not create any confliction.
3. Use a Shared Folder for Sessions

Using a shared folder can help create redundancy and create a more stable workflow.
When you go to create a new session, create it within a Shared folder on your drive. This is good practice to get into the habit of doing and helps to create a redundancy net, if for some reason your computer goes down or you get locked out of your account you will always have access to that Shared folder no matter if you have to log in through a general account or in safe mode. On a Mac you can find one within your User directory labeled Public or if you’re on a PC there is a public folder within each main directory i.e. Documents or Pictures.
Creating a session in a shared folder can also free up errors that happen when permissions are set wrong on some folders, this can cause unstable and slow sessions. Having a folder with open permissions like the shared folder helps to eliminate many of these issues.
4. 1 folder per look
If you are doing an editorial type shoot where you have different looks or shots throughout the day I find it best to create a new Capture folder for each set within your session. I label them according to whatever I am shooting, so if I have 5 different looks today I would have 5 folders such as Look1, Look2, etc. This helps not only in organization but also in cutting down the number files in a folder which I recommend to be kept at 300 images or less for optimal performance.
5. Place your most used folders in the favorites

This helps you stay more organized and provides a more stable session.
Now that you are using a new Capture folder per look you need a better way to organize! I find the easiest way is to utilize Session Favorites which tags folders that you want to use and pins them to Session Favorites under the Library tool tab. Find the Session Favorites section in the library tool, hit the + symbol, then navigate and select the folders you want to add. You can also drag folders from the Finder window and drop them into Session Favorites. Once added you can easily navigate in and out of shots and set new Capture folders easily.
6. Hide what you don’t need!

Make your workspace right for you.
Capture One Pro is awesome at customization, you can make it look and perform however you need it to. For the most part you do not need half of the tool that you are presented with when launching Capture Pro for the first time. Mine recommendation is pick a tool tab to work in such as the Adjustments or Exposure Tool Tab, delete the tools there you don’t need, then add the tools you do need. Delete tools by selecting the little down arrow at the top right of the tool. Add a new tool by right clicking on the current tool tab and selecting Add Tool. This will help you streamline your workflow and boost efficiency.
As a bonus you can also save this workspace by going to Window > Workspace > Save Workspace…, you can then access it at anytime and create a copy of it if you work on multiple workstations.
7. Create a copy of your workspaces and styles.

Copy what you want to backup from here.
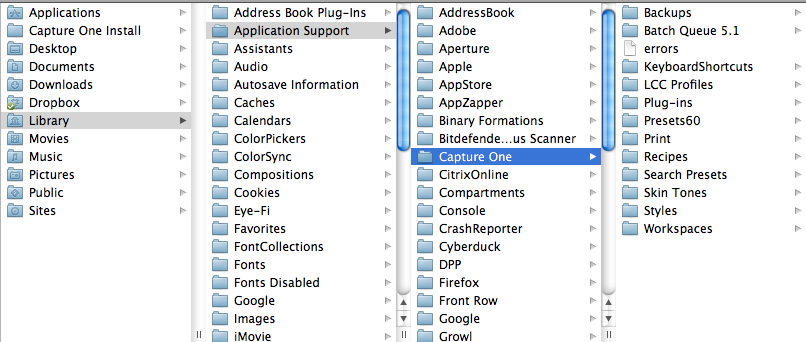
If you are a digital tech or work in a studio with multiple computers then it may be imperative to create a backup of your workspaces, preferences, and styles. If you haven’t done so already the easiest and most effective way is to dedicated a thumb drive and create a copy of your settings so you can move them around to computers or jobs so you will always be prepared. You can locate many of these saved preferences on a Mac in User > Library > Application Support > Capture One, from there you can select which settings you would like to backup be it workspaces or styles.
8. Capture Pilot
This is one of my favorite features in Capture One, it gives you the ability to view real time previews on your iPad, iPhone, and now as of Capture One 7 in your web browser. This gives you the ability to share shots with your art director/client and gives them easy access to rating and color tagging on the go.
Setup is fairly straight forward; Under the Capture tool tab is where the Capture Pilot tool lives by default. Within the tool you can set a server name, password, which images can be viewed, and the level of control the device can have. If you are wanting to work on an iPad/iPhone then I recommend downloading the Capture Pilot app for free from the app store, launch the app with the device on the same Wifi network, then select the server and start rating. If you want to access Capture Pilot through a web browser version just select the Web tab in the Capture Pilot tool in Capture One then click the Local IP address at the bottom to launch the browser viewer. This link can be used on any device to access the shared folder as long you are on the same wireless network. Learn more about Capture Pilot here.
9. Before & After

A somewhat hidden but useful feature.
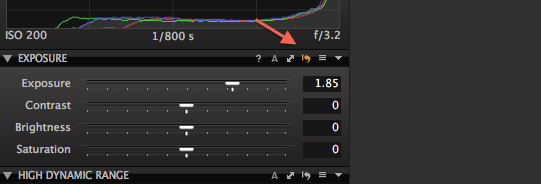
Something I just learned myself, if you hold down the option key, click, and hold the reset arrow on an adjustment tool it will show you the before. As soon as you stop clicking, the tool will revert back and show you the adjustment again. This is great for referencing or showing clients quick changes.
10. Stay Up to Date!
The easiest way to keep yourself in the loop and up to date is to subscribe to our RSS to follow our blog, suscribe to our newsletter, send us emails, leave comments, and ask questions! We are all here to help support our customers with any problems or questions they may have. All of our sales, marketing, and tech support teams are Phase One Certified Professionals and are able to troubleshoot and answer your hardest questions (and easiest!).
Further Resources
Need to uninstall or reset Capture One?
Licensing Issues?
Still running Capture One 6 and need to tether a Canon?
Looking for some tutorials?