Why?
It may seem odd to move photos from one part of the program into a completely different part. Some may say it doesn’t even make sense. We have a reason for this!
We test each release of Capture One extensively, and have still found the catalog system still to be quite unstable. So unstable, that we still currently do NOT recommend the use of catalogs in Capture One. So what if you didn’t know that – now what do you do?
How Catalogs differ from Sessions
Session Folder Structure Layout

(click to enlarge)
Capture One 7 utilizes two methods for organizing your images: Catalogs & Sessions. The Sessions method creates four pre-defined folders (Capture, Selects, Output, Trash) for each session or “shoot.” With Sessions, the overarching idea is everything is self-contained. When you make edits, Capture One stores a “CaptureOne” folder next to your RAW files which contains a Settings70 folder which has all the adjustments you have done in a .cos file. The CaptureOne folder also holds a “Cache” folder which contains image previews and focus masks. This can be useful if you wish to quickly navigate to another session’s images without changing sessions. All of the edits made in one session show up in other sessions automatically, since the “instructions” are right next to the files.
Inside the Catalog

(click to enlarge)
You can see inside a catalog by right clicking on it and choosing “Show Package Contents” – but do NOT make any changes or you will risk catalog corruption and data loss.
Catalogs, however, work quite differently. Instead of storing the edits, masks, and previews next to the raw files, Catalogs keep those instructions, previews, and focus masks stored inside the catalog itself. Also, quite differently from Sessions, Catalogs can store the files themselves inside the catalog if you wish.
Alternatively you can allow a Capture One catalog to keep the files in their current location on import (allowing you to organize the files on disk the way you want), but the important stuff (namely the settings/edits) still remain in the catalog. If you must use catalogs, this is the preferred method, because even if the catalog becomes corrupted, the raw files are not lost or destroyed. This also allows you to keep images on multiple external drives, rather than all on the same hard disk.
Catalog File Structure
(click to enlarge)
As you can see in the example above, figuring out where a particular file is located can be difficult. It’s better to leave the internal components of the catalog alone.
Moving from Catalogs to Sessions
That said, we need to move the files out of the catalog with the settings in tact. Based on the state of your catalog, you’ll have one of the following configurations:
Catalog File Structure

In the Folders section under the Libary tab, you can tell how many images are stored inside the catalog by the number next to “Catalog.”
- All of your images are stored inside the catalog.
- None of your images are stored inside the catalog, but are in their own location on disk.
- Some sort of mix between #1 & #2.
NOTE: The basic method for extracting these files is the same, but a few details will be different. Regardless, your files will need to be temporarily duplicated in the process, so it’s best to do these one session at a time for storage reasons. It’s also a good idea to make a backup of your images and catalogs as they are now, just in case. Murphy’s law has a nasty habit of showing up when you least want it!
Setup
Create a New Session
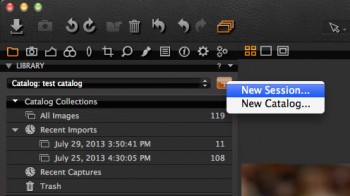
(click to enlarge)
New Session Settings
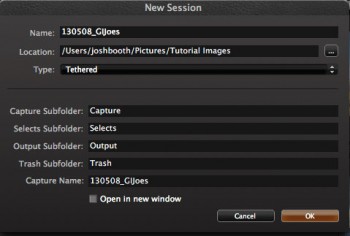
(click to enlarge)
Enter in the name & location of your Session and choose Tethered for Session Type.
Chances are you have already developed a system for storing your images in a way you like and understand, so this is tutorial is not going to force you into a new method of organization. However, you need to decide where and how you want your images to live outside of the catalog – especially if they have been stored internally in the catalog instead of referenced in existing locations.
In both cases may be easier to set up the Session before exporting your RAW files. This creates a Captures folder within the Session folder, giving us a location to put our exported RAW images. Click the + button at the top of the Library tab or the File menu at the top of the screen, choose New Session. Enter an appropriate name for your Session.
The Session Type is entirely optional, but many find it helpful to choose Tethered even if you don’t plan on tethering. This is sometimes preferred since it creates a nice Capture folder where you can put your images or subfolders of raw files.
Working with Images Stored in the Catalog
Export Originals

(click to enlarge)
Choose the Captures Folder
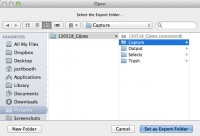
(click to enlarge)
Export Settings
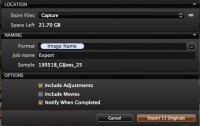
(click to enlarge)
Make sure that “Include Adjustments” is checked!
Remove from Catalog

(click to enlarge)
Now that you have created a session to contain your cataloged images, it’s time to export them to the corresponding folder.
- Select the images that you wish to export, then choose File > Export > Originals from the Menu bar. It will bring up an export dialog box.
- For Store Files, choose the captures folder for the session you created earlier.
- Naming on export is an optional step, and you may wish to if you have not already named your images. Otherwise, set it to Image Name to keep the existing filename.
- Make sure that Include Adjustments is checked, then hit the Export ## Originals button in the bottom right.
- Now that images have successfully exported, open up the Session and verify that every looks as it should.
- Once you are confident the images and settings have been successfully transferred, some may prefer to keep the catalog intact as a backup, but you may choose to delete the images to conserve space. Do this ONLY after you are confident in your transfer. When ready, you can select the images in the catalog, and choose Remove from Catalog where you get a dialog asking if you want to move the files to the catalog trash. This is a nice preventative measure in case you did not mean to delete the files, but it does not free up disk space.
- To empty the files in to the system trash, in Capture One go to the File menu and choose Empty Catalog Trash.
Working with Referenced Images
For images that are referenced in their existing location OUTSIDE of the Capture One Catalog, the process is not much different. The advantage is you may already have a folder set up.
NOTE: In order to simplify this process, I attempted to export to the folder where the images were already stored hoping it would not duplicate the files and just export the adjusted settings. Instead, Capture One would hang and crash. So don’t do that!
It may seem redundant to export duplicates, but what you are really exporting is the RAW settings. At this time, there is not a way to export ONLY the settings from a Capture One catalog, so duplicating files is the necessary bi-product.
Moving Folders
(click to enlarge)
- If you have not already created the Session you want to put your images into, do so now.
- Follow Steps 1-5 above.
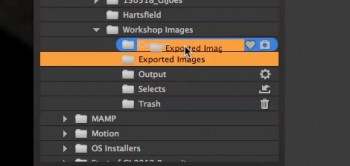
- If you want subfolders of images under the captures folder (or accidentally exported the folder to the wrong location), you can drag whole folders into others from the Capture One Library tab. Simply click on a folder and drag on top of another folder then let go. Capture One will warn you it is about to move files.
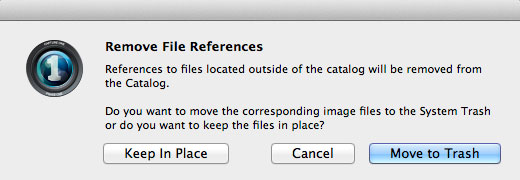
- Once you are confident that the images have transferred successfully, you may delete the originals. From the Capture One catalog, you can select the images you previously exported and choose Remove from Catalog. This time, you will see a different dialog box asking you what you want to do with the images that were referenced by the catalog.If you choose Keep in Place the images will remain where they were stored on disk, and will not be deleted. They are only removed from the catalog. The other option, Move to Trash sends the files to the System Trash as well as removing from the catalog. Notice that referenced images never go to the catalog trash.
Removing File References
(click to enlarge)
Summary
Any time you are working with important files, you should always perform a backup. This is especially true when you may begin deleting files. The biggest reason for exporting from a catalog (versus just dragging them to a folder) is to get the .cosettings files which contain your editing instructions, but if you chose to store your images internally in the catalog, you will need the raw file too. The simplest way for both methods creates duplicates, which you can safely remove after a successful transfer.
When working with your images, it is always good to exercise caution. If you have any questions regarding this, don’t hesitate to reach out to us at Capture Integration for help or advice!