Many people have contacted us for support with issues when connecting to Phase One’s Capture Pilot app on their iPhone/iPad/etc, especially when using an Ad-hoc network from a computer or Phase One IQ2 digital back (an Ad-hoc network is a device-to-device wifi network created by one device when there isn’t a wifi network to join). It seems like every time they try to connect at first, they get the dreaded “No Network Found” or “Cannot Find Servers” dialogs until they want to throw the device across the room.
Eventually it kicks in, but the annoying matter has already occurred – sometimes taking 5,10, or 15 tries to get it to connect and see the server. While there are times when an actual problem is the culprit, following this one simple step can alleviate MOST of the issues people experience when trying to connect with Capture Pilot. I’m going to warn you, however, that most people HATE this very important step: Waiting.
Boring, yet Important
This is a very technical article about very boring yet important information! If you are a photographer, non-techy person, or just plain impatient and don’t care about the Why just the How – the quick steps to use are listed directly below. If you are a digital tech, technologically curious, or want some potentially good trivia material, keep reading at the risk of boredom and/or further understanding! It also details a way to shorten this waiting process significantly. You can use the links below to choose your own adventure.
The Quick Answer:
The bottom line: most of the time after people join the network, they attempt to open Capture Pilot and connect to the server before the iOS device is ready. In ad-hoc networks, the iOS device has to create its own IP address, and that can take anywhere between 15-20 seconds or so before it can be used. Fortunately, there’s an easy concrete way to tell when it’s ready.
- On the computer or Phase One IQ2 digital back, start the ad-hoc network. Then (on the computer) open Capture One Pro and start the Capture Pilot Server.
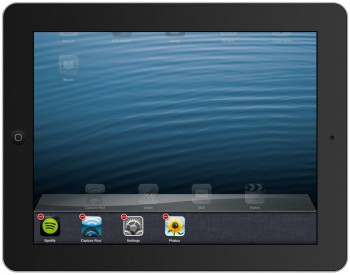
- On the iOS device, make sure the Capture Pilot app is completely closed. To do this, double tap on the device’s home button. If visible, press and hold on the Capture Pilot app to start the app wiggling, then press the red circle to close the application.
- On the iOS device, go to Settings > Wifi.
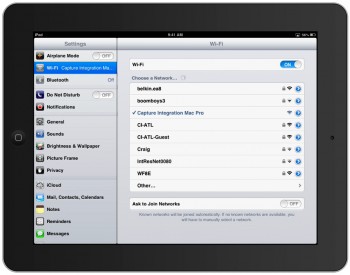
- The iOS device will search for available Wifi networks, so tap on the one you created to join. Don’t quit Settings yet!
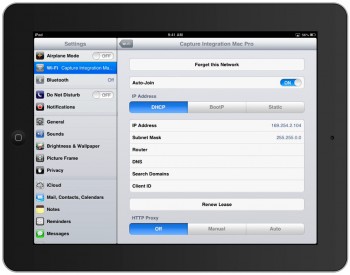
- Next, tap on the blue circle button with a white arrow next to the network name. This takes you to the Advanced Network Settings screen.
- Wait and watch the IP address and subnet mask fields. Once the iOS device has assigned its IP address, it will show up and is now ready to use with Capture Pilot.
- Open the Capture Pilot app, select the Capture Pilot server, and you should be ready to go!
-
Force Quitting Capture Pilot

(click to enlarge)
Tap on the red circle to force Capture Pilot to close.
-
Join the Network

(click to enlarge)
Tap on the network to join, then tap the blue arrow button to the right.
-
Advanced Network Settings

(click to enlarge)
Turn on Auto-Join. Wait until the IP address appears before opening Capture Pilot.
The Techy, More In-Depth Explaination:
What happens in the background when you join a wifi network:
As stated earlier, most of the time when people are joining a wifi network or ad-hoc network, they just select the network, close out of settings and open up Capture Pilot app to attempt to join the Capture Pilot server right away. The problem is, that doesn’t allow enough time for the process of the iOS device to get network ready. Essentially what happens is people often jump into Capture Pilot before the iOS device is even fully on the same network as the computer / Phase One IQ2 back. When connecting to an existing wifi network, this process happens so quickly that most people never know what happens in the background, so when faced with a slower process, they aren’t aware the iOS device isn’t ready. To better understand what is going on, here is the process that occurs when joining a wifi network (ad-hoc or not) on an iOS device:
- The iPad (iPhone/iPod/iPad Mini all apply) searches for existing wifi networks within its range.
- When you tap on a particular network to join, the iPad begins the process of joining that network.
- It sends a signal to the router, then waits for a unique IP address to be delivered to it. Every device on a network has its own unique IP address, and is usually delivered by the wifi router as needed through a method called DHCP (Dynamic Host Configuration Protocol).
- Once the IP address and Subnet mask (subdivision of larger networks) is delivered to the iPad from the router, the iPad successfully connects and is ready to go. You will see the wifi symbol in the top left hand corner of the iPad signifying it has an IP address and has successfully joined the network.
- If the router fails to deliver an IP address and subnet mask through DHCP, the iPad will attempt a couple of times before finally giving up and creating a self-assigned IP address (usually beginning with 169.254.x.x)
When joining an ad-hoc network, no IP addresses are given via DHCP. Which means it takes longer for the iPad to join and be ready on an ad-hoc network because it has to wait long enough to decide to self-assign its IP address (it also means that there won’t be a wifi symbol in the top left corner). This is the crucial step that most people forget when attempting to use Capture Pilot over ad-hoc. If you tap to join the network and immediately go to the Capture Pilot, it’s still not fully on the network, which is why Capture Pilot gives you a “No Network Found” error.
The Better Way
Waiting isn’t popular these days, as we want things faster and more immediate – and using Capture Pilot is no different. We want it to work right away, and with the testing I did, this method worked tried and true on multiple computers and allowed me to join the Capture Pilot server on my first attempt every time. There may be exceptions, but the following steps worked flawlessly in our testing. These steps are primarily aimed to those who are using an Ad-hoc network, but the principles apply to joining pre-existing wifi networks as well.
-
Force Quitting Capture Pilot

(click to enlarge)
Tap on the red circle to force Capture Pilot to close.
On the iOS device (iPad, iPhone, etc), make sure the Capture Pilot app is completely closed. To do this, double tap on the Home button to bring up recently used applications. If needed, swipe left or right along the bottom to find the Capture Pilot app, press and hold on its icon until it starts wiggling, then tap on the red circle in the top left hand corner of the app. This completely closes the application.
- On the computer / Phase One IQ2, set up the ad-hoc network. On a Mac, you can click on the wifi menu in the menu bar at the top of the screen and choose “Create Network.” You will see the wifi symbol change too, if you are on a Mac. Then open Capture One and start the Capture Pilot server.
- On the iOS device, go to Settings > Wifi and search for the network you created, then tap on it to join. Don’t leave the Settings yet!
- Tap on the blue arrow to the right of the network to view the Advanced Network Settings screen.
- Tap the Auto-Join switch to ON. If the iOS device becomes disconnected or falls asleep it will automatically reconnect.
- Wait. It took me about 15-20 seconds on average to get an IP address on an ad-hoc network. Once an IP address is self-assigned, it will show up.
- Once you see an IP address, close the settings app then open the Capture Pilot app on your iOS device. You should see the Capture Pilot server and be able to join by tapping on it.
-
Join the Network

(click to enlarge)
Tap on the network to join, then tap the blue arrow button to the right.
-
Advanced Network Settings

(click to enlarge)
Turn on Auto-Join. Wait until the IP address appears before opening Capture Pilot.
If you are consistently connecting to the same device every time, such as your laptop or tethering workstation, you can speed up the process by disabling the DHCP waiting on the iOS device and manually entering the IP and Subnet Mask. This works if you consistently name the Ad-hoc network the same name, because the iOS device will remember the settings for each network. The following steps show how to manually enter your info to quickly speed up this process and cut down on the waiting.
Use a Static (non-changing) Manual IP address:
- On the iOS device, follow steps 1-5 above.
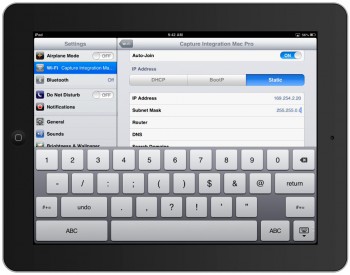
- On the Advanced Network Settings screen, there are three buttons, and DHCP should be highlighted. Tap on the Static button to the right and you should see the IP address & subnet mask disappear if they are already assigned.
-
Static IP

(click to enlarge)
Change to Static and manually enter the IP address & Subnet Mask.
You will want to enter something similar to the IP address & Subnet Mask on your computer / Phase One IQ2 back, which you can access from System Preferences > Network Preferences. In most cases, a self-assigned IP address will be something like 169.254.x.y where you can fill in whatever numbers you want and the subnet mask will be 255.255.0.0. Tap the Wifi Arrow in the top left hand corner to get back to the main Wifi screen.
- You now have a self-assigned IP address. From now on, you should be able to just tap on the network, and open the Capture Pilot app almost right away. It’s still a good idea to have Capture Pilot completely closed before trying to join it the first time for each session.
There may be times when you use the above methods and it still has trouble connecting. That could indicate problems elsewhere, such as the iOS device may need to be restored to factory settings, etc, but this should help MOST people when attempting to use Capture Pilot. Be sure to check out our post on explaining & troubleshooting Capture Pilot and the Phase One IQ260 Wifi for other ideas. If you have questions, don’t hesitate to contact us by calling us or email josh@captureintegration.com for more info.