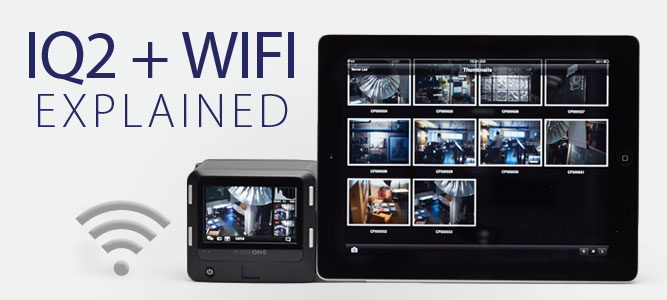
 One of the key features in Phase One’s recently-released IQ2 digital backs is the ability for the back to either join or create a WiFi network to wirelessly tether with the Capture Pilot app on an iOS device. There’s nothing like being in the middle of an open field (literally) and being able to render a 1:1 preview for focus check on your 9.7″ iPad screen while there isn’t a computer or even an existing WiFi network around for miles. Or say you get to location and forget your cable release – in some cases you could capture straight from the Capture Pilot app wirelessly. The new WiFi feature adds incredible flexibility to using this back in a variety of circumstances.
**For the sake of this article, most any Apple iOS device capable of installing the Capture Pilot app can perform all the functions listed here. This article will discuss the iPad primarily, but unless otherwise noted the other devices work as well.
The IQ2’s Two Approaches for WiFi
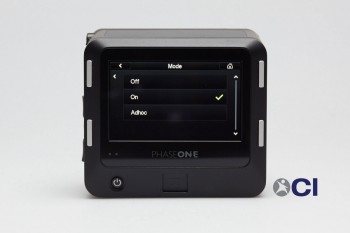
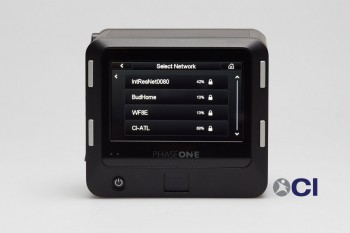
The IQ2 has two main approaches for wireless tethering: joining an existing WiFi network or creating its own. From the back’s main screen, choose Menu > Wifi > Mode and you are presented with three options: Off, On, & Adhoc. By choosing On, the IQ2 can join an existing WiFi network by choosing the Select Network option from the Wifi menu (or it may open on its own) and choosing the Network of your choice. It lists the signal strength as a percentage, and shows a lock icon for each network that requires a password. Choosing a password protected network will prompt you for the password, and remember that password until you manually clear all network passwords.
-
IQ2 Wifi Methods
(click to enlarge)
-
Selecting a WiFi Network
(click to enlarge)
-
Choosing Adhoc
(click to enlarge)
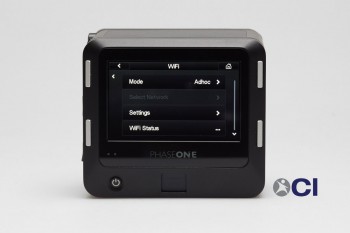
The second method for the IQ2’s wireless tethering is Adhoc, which is a term that simply means “for this.” In other words, it can create its own wireless network that devices can join when one isn’t around. Like any WiFi network, the connected device’s distance, nearby signal interferences, and even the IQ2’s battery level can affect the strength and reliability of this network. But since no existing network is required, this is a HUGE feature of the IQ2 series with a lot of benefits and uses.
The WiFi Settings
The Wifi Settings Screen
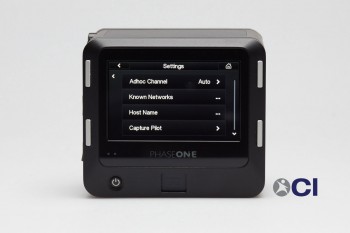
Click to Enlarge
Even though the IQ2’s Wifi is fairly simplistic, you can access specific WiFi Settings from the WiFi Menu by choosing the Settings button. Here it lets you choose a specific or automatic Adhoc channel, see a list of known networks (and clear the stored passwords), change the Host Name for the digital back, and access specific Capture Pilot settings. To customize the Capture Pilot server, you can choose to enter a 4-digit PIN code to password protect your Capture Pilot Server, change what users of the Capture Pilot app are able to do such as initiate a capture or rate images, and enable the Capture Remote Server option, which only allows the user to capture and does not transfer thumbnails or image previews.
On: Joining the IQ2 to an Existing WiFi Network
From the IQ2’s main screen, go to Menu > Wifi > Mode and choose On. It should revert back to the WiFi menu. Now you need to choose a WiFi network to join. If it doesn’t automatically ask to you select a network, choose Select Network to see a list of nearby visible WiFi networks the IQ can detect. Choose the appropriate network and if a network password is required, type that in on the next screen. With the iPad or iOS device connected to the same WiFi network, open the Capture Pilot app and choose the correct server to begin.
Adhoc: Creating the IQ’s Own Network
If there are no existing WiFi networks around, the IQ2 can create its own wireless network, called an Adhoc network. From the IQ2’s main screen, go to Menu > Wifi > Mode and choose Adhoc. It should revert back to the WiFi menu. Notice that Select Network is greyed out and unavailable. You can go to Settings to customize, but this tutorial will use the default settings. In order to access the IQ2’s Capture Pilot server, the iPad or connecting device first needs to join the IQ2’s WiFi network that it is now generating. On your iOS device, go to the Settings app > WiFi and choose the IQ2’s network name. By default, this is “PhaseOne” and the IQ2’s serial number. You will also want to enable Auto Join. To do this, click on the blue arrow icon next to the network name, and turn tap on the Auto Join on/off switch – no need to slide it unless you want to! This helps your device reconnect to the IQ2 if it goes to sleep or loses the connection for some reason.
-
iPad: Choosing a Network
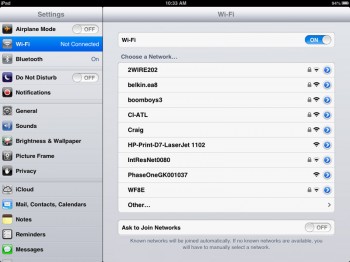
(click to enlarge)
On the iOS device go to Settings and tap on Wifi.
-
iPad: The Blue Arrow
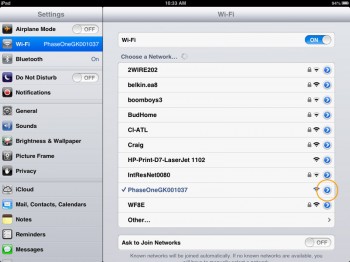
(click to enlarge)
Tap on the Network you want to join, then tap on its blue arrow button on to the right.
-
iPad: Enable Auto Join
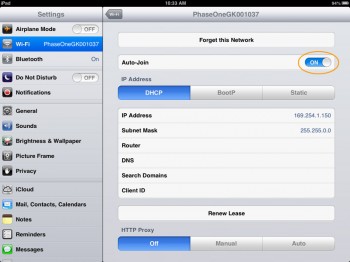
(click to enlarge)
Tap on the On/Off switch next to Auto Join.
The WiFi Status Screen Explained
The WiFi Status Screen
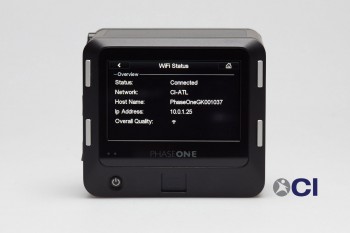
(click to enlarge)
Wifi Status Details View
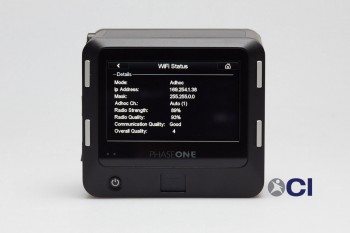
(click to enlarge)
You can access the WiFi Status screen from the IQ2’s WiFi menu, or by clicking on the WiFi symbol in the bottom toolbar on the main screen if WiFi or Adhoc are enabled. It first displays the Overview screen which shows the current Connection status, the Network joined (which will be the same as the Host Name for the Adhoc network), the Host Name of the digital back, the digital back’s network IP address and Overall Quality. If using an Adhoc network, the IP address will typically be something similar to 169.254.1.7.
If you scroll down on this screen, you can access Details and Networks found at last scan. If you experience connection difficulties or slowness while using the IQ2 and Capture Pilot, these set of Details can shed some light on what might be happening. Unfortunately, there is not a lot of documentation from Phase One regarding what these settings mean. To get to the bottom of it, we spoke with Phase One directly to get an in-depth explanation of these settings, detailed below.
Mode: Adhoc, On, or Close. Close signifies that WiFi is on, but not connected to any networks.
IP address: This is the unique address assigned to your IQ2 by the network. In Adhoc mode, it designates its own and usually begins with 169.254.1.x where ‘x’ may be any number typically between 1 and 254.
Mask: Short for Subnet Mask. According to Wikipedia, it is a logical division of a network. The thing to remember here is, the subnet mask needs to be the same subnet mask as the WiFi’s router. In Adhoc mode, the subnet mask of the connecting iOS device must match the IQ2’s (usually 255.255.0.0). Chances are you won’t need to mess with this at all, but it helps to understand what is going on.
Adhoc Ch: Displays the channel that the Adhoc network is using. Auto tries to select the channel with the least amount of interference.
Radio Strength: This is a percentage reflecting the amount of signal amplification needed to reach the connected device. The score seems a little backwards because when the percentage is lower, it means the signal is being amplified more to reach the device. Consequently, this will also drain the battery much faster like it does on cell phones when in an area of low signal strength. When my iPhone 5 was a couple of inches from the back, signal was 100%, but as I moved away this number dropped – sometimes significantly depending on interference levels.
Radio Quality: This is also a percentage reflecting the purity of the WiFi signal based in its current environment with external interferences like other existing WiFi networks, random radio signals, microwaves, etc. Areas which contain high amounts of competing interference can cause troubles, which is one reason why Phase suggests disabling bluetooth on devices before using Capture Pilot. The bluetooth frequency can easily interfere with WiFi since it is nearly the same frequency.
Communication Quality: Gives ratings such as Good, Degraded, and Bad. This doesn’t reflect the signal strength, but changes depending on how many times the IQ2 has to retransmit packets of information to the receiving device. The more often it has to retransmit, the worse the communication quality reports. In theory you could have a good, strong radio signal (connection to the device) & quality (purity of the wifi signal), but based on a variety of factors like interference, software preoccupation (the back is busy processing something else), etc, it may miss data packets being sent through the air and need to resend them again – resulting with a lower Communication Quality score.
Observations
Here are some observations so far regarding the IQ2’s WiFi Performance:
- Unlike the computer-powered Capture Pilot Server, the IQ2 can only connect with iOS devices (sorry Android/Windows phone users), and only one device can communicate with the server at a time.
- Similarly, the IQ2 does not generate an accessible web page like Capture Pilot Server from the computer will.
- Because the back is not only powering the internal components needed to capture, display the LCD, etc, and now also powering the radio frequency needed for the WiFi (in ad-hoc mode) and image transmission, battery drain will be MUCH faster.
- Additionally, a low battery in the IQ2 tends to exhibit more inconsistency in the reliability of the WiFi connectivity.
- Live View will not occur on the iOS device. The IQ2 can perform Live View via the back’s LCD display, but this does not transfer to the iOS device. Sending a Live View data stream would be too much data to send wirelessly for effective frame rates and performance.
- If the IQ attempts to connect to an existing WiFi network, and the router does not give it an IP address, there is currently no way to manually enter in this information. In other words, if when joining the network the process doesn’t initialize properly automatically, there is no way you can override it. This also affects users who do not broadcast the SSID, or WiFi network name, since they cannot manually enter in a network name. We have been in communication with Phase One regarding this, and will keep you posted when something changes.
Troubleshooting Tips
So what are some practical steps you can do when Capture Pilot or communication with the IQ2 becomes consistently unstable or unusable? Here are some things to try starting with some quick and easy fixes to a couple of more heavy-handed approaches.
- On iOS7? Check out this quickfix we found.
- If connected to Adhoc, try switching your iOS device to a different WiFi network then back again, or turn off WiFi in the settings for approximately 20 seconds and back on again. This helped when although the device was connected to the IQ2, Capture Pilot couldn’t find the Capture Pilot Server.
- If Capture Pilot begins to significantly slow down and no longer render thumbnails or you start seeing the processing wheel, it may be starting to lose the connection to the server. Try the fix mentioned above.
- Change the name of the Host Network under the Wifi Settings screen, then power off the digital back, wait 20 seconds, and power the device back on.
- If the battery on the digital back is low, replace with a fully-charged 2900mAh battery. (see why here)
- Check the Wifi status screen to get an idea of the nearby interferences that could be causing trouble, and change to a different Adhoc network channel.
- Force quit the Capture Pilot App. Press the home button on your iOS device once to exit the app, then double-tap the home button again to bring up the recently used app screen. Press and hold on an app until they begin to shake and a red circle with a white line appears in the top left corner of the application. Tap the red circle to force the app to quit. Re-open the Capture Pilot app and retest, or perform the fix in step 1 then re-open the app.
- Restart the iPad and power cycle the digital back by powering off the device and removing the battery. Wait 10 seconds before putting the battery back in and turning on the IQ2.
- Test using a different iOS device.
If the above steps do not solve the problem, or the results are wildly inconsistent, here are a few more heavy-handed approaches. It is advised to first back up your data on the iOS device and make sure any important information is also synced and accessible on your computer, in case you cannot use the backup to restore your information. The following steps listed below will erase the information from your iOS device. For more information on this, visit the apple.com support section.
- Erase All the Settings from the iOS device – Go to Settings > General > Reset > Erase All Content & Settings. Visit iOS: Understanding ‘Erase all Content & Settings’ for more in-depth information. This will erase all settings and data from the device (yes, even your pictures) but does not touch the operating system. This helps if a quirky setting is causing your troubles, but may fall just short of what is needed to fix.
- Restoring and Setting Up as a New Device through iTunes. This is the grenade-for-the-fly fix, but I’ve seen it fix many, many issues. For reasons far above my understanding, occasionally there are minor hiccups that happen in background of the iOS operating system called ‘software corruption.’ It’s hard to say exactlywhat causes this, but it could be unclean shutdowns, forced shutdowns/restarts by holding the home button and power button together (it’s like pulling a plug on the computer – don’t do it unless you have to) or an app that doesn’t install properly. It’s the software equivalent of rolling your ankle. It may not even be noticeable, but can cause troubles during certain tasks.The only way to know for sure is to completely erase the device, and not use the backup to restore information. Otherwise, you could put the corruption right back on the device. As mentioned earlier, Erase All Contents & Settings does not touch the operating system on the iOS device. Restoring through iTunes (see iTunes: Restoring iOS software) not only erases your data, but wipes and reinstalls the most up-to-date iOS version for your device. After the reinstall is complete, set up the device as New then jump straight to installing Capture Pilot to retest. If it works better, then just set up the device like you did when you first bought it. If it doesn’t help any, you can restore the device again, this time using your backup to put everything back the way it was before.
If you are still experiencing troubles after trying any of the above fixes or have questions somewhere along the way, please don’t hesitate to get in touch with us.