While it may seem that a lot of Capture One users are commercial photography studios, Capture Integration has a lot of customers who shoot large volumes of images at one time. For example, many wedding photographers love the quality of the images that Capture One produces. One common request that we get all the time is a way to increase workflow speed within Capture One. So here for your downloading pleasure is Capture Integration’s High Volume Keyboard Shortcuts Preset.
Installation Instructions
Open the Edit Shortcuts Window
(click to enlarge)
Choosing a New Shortcut Preset
(click to enlarge)
Choose High Volume
(click to enlarge)
Currently, these shortcuts are Mac-only.
- On a Mac, go to the Finder (click on the blue Smiley-Faced guy typically found on the bottom left of your Dock)
- Click on the Go menu at the top of the screen and select “Go to Folder”
- Copy and Paste in the following (excluding the quote marks) and hit Go
“~/Library/Application Support/Capture One/”
- Copy “High Volume.plist” into the KeyboardShortcuts folder.
- If Capture One is open, you will need to quit and reopen to have access to the new keyboard shortcuts. To access them, go to the Capture One menu then choose Edit Keyboard Shortcuts.
- Select High Volume from the pull down menu at the top of the Keyboard Shortcuts window.
No Mouse Needed!

The Capture Integration High Volume keyboard shortcuts allow you to make many of the most common adjustments with your left hand, while using the left & right arrow keys with your right hand to change images. This allows you to quickly edit without using your mouse.
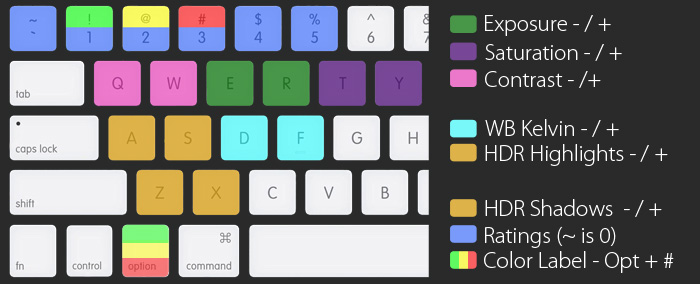
High Volume Keyboard Visual

The Shortcuts Explained:
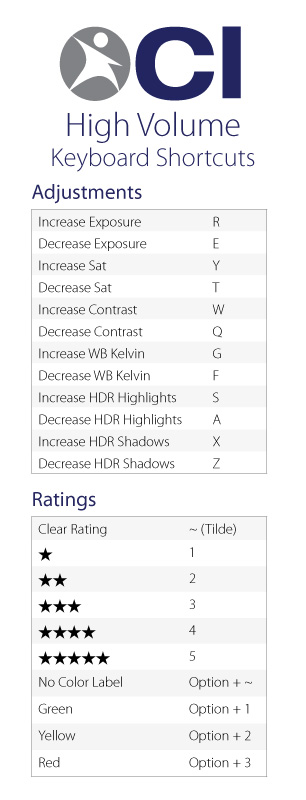
Keyboard Shortcut List

The download file also contains a PDF like the image above that you can print out and keep nearby for reference!
The keys are positioned so using only one hand you can hit the most common adjustments to quickly aid in your editing process. Combined with your arrow keys, you can edit quickly without even touching mouse or trackpad. Exposure, Saturation, and Contrast were prioritized, but also added in HDR Highlights & Shadows, White Balance Kelvin warmer/cooler, and tweaked the Rating & Color Label system.
For example, to rate something as 0, you had go to the far side of the keyboard, while 1-5 were easily accessible. Now, you can rate an image with 0 by simply pressing the Tilde (~) key located next to the 1 key. Also, to quickly add a color label of Green, Yellow or Red, you can press the Option/Alt key and 1 (Green), 2 (Yellow), or 3 (Red).
Top Row (QWERTY)
- Contrast -/+
- Exposure -/+
- Saturation -/+
Middle Row (ASDF)
- HDR Highlights -/+
- White Balance Kelvin -/+
Bottom Row (ZXCV)
- HDR Shadows -/+
- C – Select Crop Tool (default)
- V – Select Pointer Tool (default)
Additional Notes
Due to the way these shortcuts were created, many of the above keys cannot be changed. There are also couple of additional added shortcuts worth mentioning that aren’t listed on the sheet:
- Hide JPEGS (in case you shoot RAW + JPEG ) – Command + Option + J
- Rename Selected Image(s) – Command + Shift + R
- Toggle the Viewer – Command + Option + Shift + V
Hopefully you will find these shortcuts useful! If you have any questions, please don’t hesitate to contact us or leave a comment!