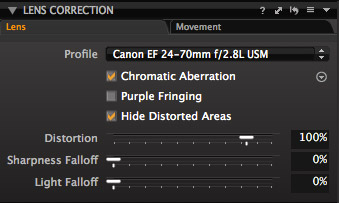
The Problem:

(click to enlarge)
A common question we have been hearing lately in our software tech support at Capture Integration is how to turn off Capture One’s automatic Lens Correction – specifically Distortion Correction. Many times users do not want distortion correction to occur automatically in their image, but Capture One applies this adjustment by default. Furthermore, there isn’t a way to turn it off (yet). We have been in communication with Phase One regarding this issue, and will keep you posted when things change.
The Solution:
Fortunately, we have provided a workaround. At the link below, you can download a User Preset for turning off Distortion Correction and Hide Distorted Elements. This should keep the Lens Profile in tact, but zeroes out the correction. If you apply this on import, it’s as close to turning that option off as possible until a fix is released from Phase One.
Installation:
- First, you need to download the Preset by clicking here. You may need to right click on it and choose Save As. Once it has finished downloading, you may also need to double click on the file to unzip it.
- Navigate to your “~/Library/Application Support/Capture One/Presets60/” folder. An easy way to do this is to go to the Go menu while in the Finder and choose “Go to Folder” then copy and paste everything in the quotes above (including the tilde ~ key) and hit “Go.”
- Drag the “No Distortion Correction.copreset” file from where you downloaded the file into the Lens Correction folder at the above location.
Using the Preset
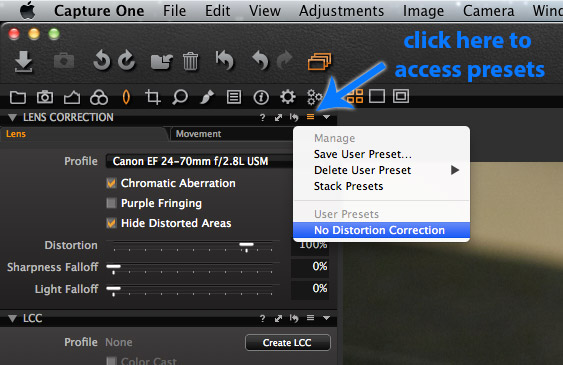
- If you have already imported the images that you want to remove the Distortion Correction from, you can easily apply a preset to all the images. Select all the images you want to remove the correction from, then navigate to the Lens Tool Tab ().
- In the top right-hand corner of the Lens Correction tab, click the small button that looks like 3 horizontal lines, and choose “No Distortion Correction” which should be listed under User Presets.
- All the selected images will have the preset applied to them, setting the Distortion Correction to 0% and unchecking Hide Distorted Areas
Applying a Preset

(click to enlarge)
The Best Defense is a Good Offense
Rather than always applying the preset after you’ve imported the images, it’s easy to set it up to do that from the moment you import your images! This is as close to turning this feature off that’s currently available. The good news is, once you set this up, it will remember to use this preset every time you import until you tell it otherwise. Here’s how:
Import Window
(click to enlarge)
Choosing the Preset
(click to enlarge)
The Results
(click to enlarge)
- Now that the preset has been installed properly, bring up the Import window by clicking on the import button in the top left-hand corner of the screen (looks like big arrow pointing down into a box) or by clicking on the File Menu and choosing Import Images.
- Choose the location of the images you want to import if it doesn’t do so automatically.
- Under the Adjustments tab, click the dropdown menu next to Styles.
- Under Presets Library, navigate to User Presets > Lens Correction > No Distortion Correction
- Make any other changes you desire before you hit import. You may additionally choose more presets and/or styles to apply at the same time, as most of these effects can “stack” on each other without interfering.
- Click on the import button to import your images. You will notice that once an image has been imported, the Distortion Correction value should be set to 0% and Hide Distorted Areas is unchecked.
- Next time you import images, Capture One will remember the previously entered settings, including the “No Distortion Correction” preset!
Summary
The biggest challenge to using this fix is getting it installed in the correct location, but if you follow the instructions above you should be Ok. While this isn’t the most ideal resolution to the situation, it will help in the mean time until there is a more permanent fix. If you have any questions, don’t hesitate to contact us or leave a comment below!